Belly fat is literally the toughest kind of fat to lose. People try every diet craze that hits the market; they exhaust themselves with strenuous exercise and workouts. But still that persistent belly fat lingers. And most do not even consider Yoga as a means to reduce belly fat, because somehow Yoga is just for those “inner peace” relaxation folks.
You would probably be surprised to learn, then, that football training now includes many Yoga positions and poses, because they tone muscles and increase flexibility, reducing the risk of serious injuries. But you don’t want to play football – you want to get rid of that belly fat. So – here are 6 Yoga poses that will do just that.
1. Mill Churning Pose
This pose actually imitates a churning work activity in India, and the motion you will be performing will look a bit like you are churning, except that you are seated on your mat and only your upper body will be moving.
Explanation of Steps:
- Sit on your mat as shown in photo #1
- Be certain that you fingers are clasped.
- Rotate your arms in a circular motion, starting clockwise
- Breathe out as you move forward and to the right; breath in as you move backward and to the left
- Do not raise your legs or feet – all of the motion is only in your upper body.
- After 10 clockwise rotations, do another 10 in counter-clockwise motion.
- You will really feel the pull on your stomach as you do these rotations, and isn’t this better than those pesky sit-ups and rowing machines at the gym?
- Other Benefits: All Yoga positions and poses have multiple benefits to both muscles and joints, but to internal organs as well. The mild churning pose has toning benefits back and thigh muscles too. Internally, it assists feminine uterine muscles and menstrual regulation. For everyone, it enhances digestive health.
2. Bow Pose (aka Rocking Bow Pose)
This pose may take a bit of practice if you have not developed good flexibility, so work first on just getting the pose, then work on holding it for longer and longer durations and, finally rocking with it.
As you can see, this pose is achieved as follows:
- Lie flat on your stomach
- Bend your knees, bring your feet up toward your buttocks (exhale during this movement)
- Grab your feet with your hands
- Inhale as you lift up your head and chest, pulling on your feet, so that your thighs come up off the mat.
- Hold this raised position for 20 seconds (you may have to work up to this)
- Instead of holding it, try rocking back and forth on your abdomen
- Exhale as you return to your original position, and rest.
- For maximum benefit, do this 8-10 times
- You will feel a strong pull on your stomach, and the rocking will serve to loosen fat cells as well.
Other Benefits
- This pose strengthens and tones our thighs, groin, back and chest muscles
- It works to improve intestinal problems and liver function
- After your 8-10 bow poses, you will be amazed at how the stress has just disappeared.
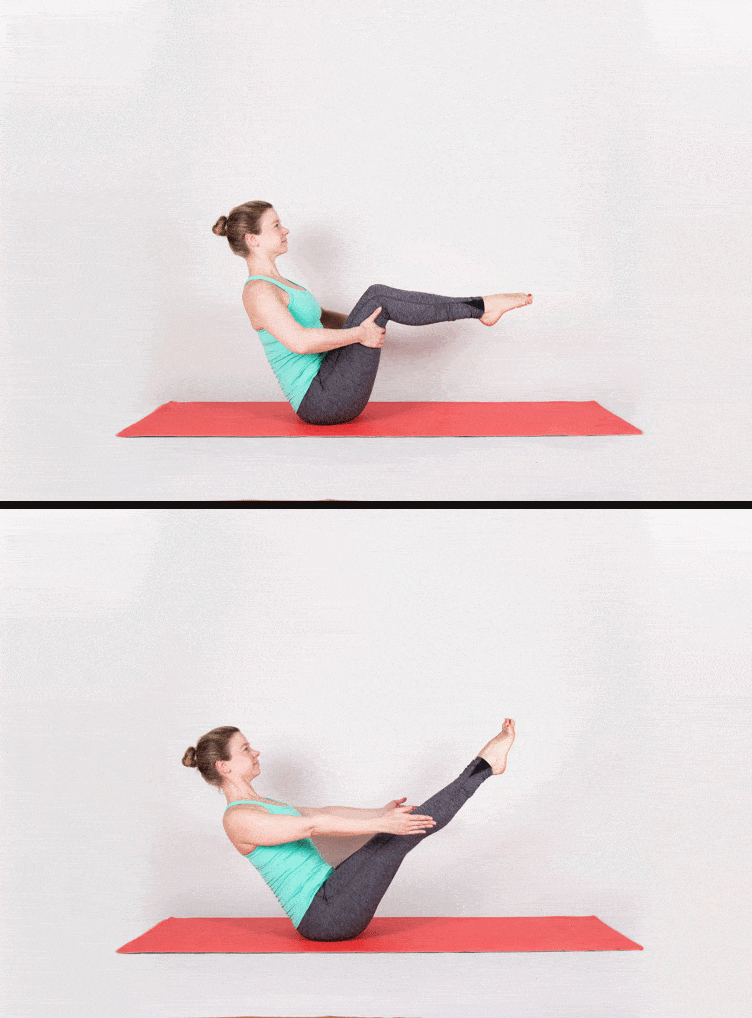
3. Boat Pose
This is one of the very best poses for winning the belly fat battle! This gif above shows the boat pose that will be held once you get there. Here is how you get there:
- Sit on the mat with your knees bent and your feet flat on the mat
- Place your hands palms down on the side of your hips
- Inhale, press on your palms and pull yourself back slowly, keeping your hips on the mat
- Lift your feet off the mat and straighten out your legs
- Extend your arms out in front of you on either side of your leg
- Try to bring your legs up as high as possible, putting your body in a “V” position
- Hold this position as long as possible, taking deep breaths as you do
- Exhale as you bend your knees and bring your feet back onto the mat.
- Hug your knees and lower your head to the top of your knees. Breathe deeply.
Benefits
- This pose improves the function of several organs – thyroid, lungs, liver, pancreas
- It also improves circulation and helps to lover blood sugar levels
4. Cobra Pose
The Cobra pose is a part of a sequence of poses, known as the sun salutations. This series is usually begun at the beginning of a Yoga session, to open up the body. The Cobra position is that part of the sequence which works specifically on the abdomen and spine, as you can see from the position. During this pose you will really feel your stomach being stretched.
Explanation of Steps
- The pose begins by lying flat on our stomach on the mat.
- Put your hands, palms down, under your shoulders
- Keep your legs stretched out and span out your toes if you are able, placing all of those toes on the mat.
- As you inhale, gradually push your chest and shoulders off the mat, keeping your elbows close to your body.
- Stretch up as high as you are able and hold the pose for 15-30 seconds
- Exhale and slowly return to the flat prone position
- Try to repeat this at least 5 times with a 10-15 second rest in between.
- As you get better, you will be able to stretch higher and higher and the higher you go the more you are pulling on those stomach muscles
Benefits
- In addition to working to reduce belly fat, this pose is great for the following:
- It strengthens you back muscles and increases flexibility in your spine
- It improves blood circulation, relieving fatigue and stress
- It helps to improve breathing and digestion
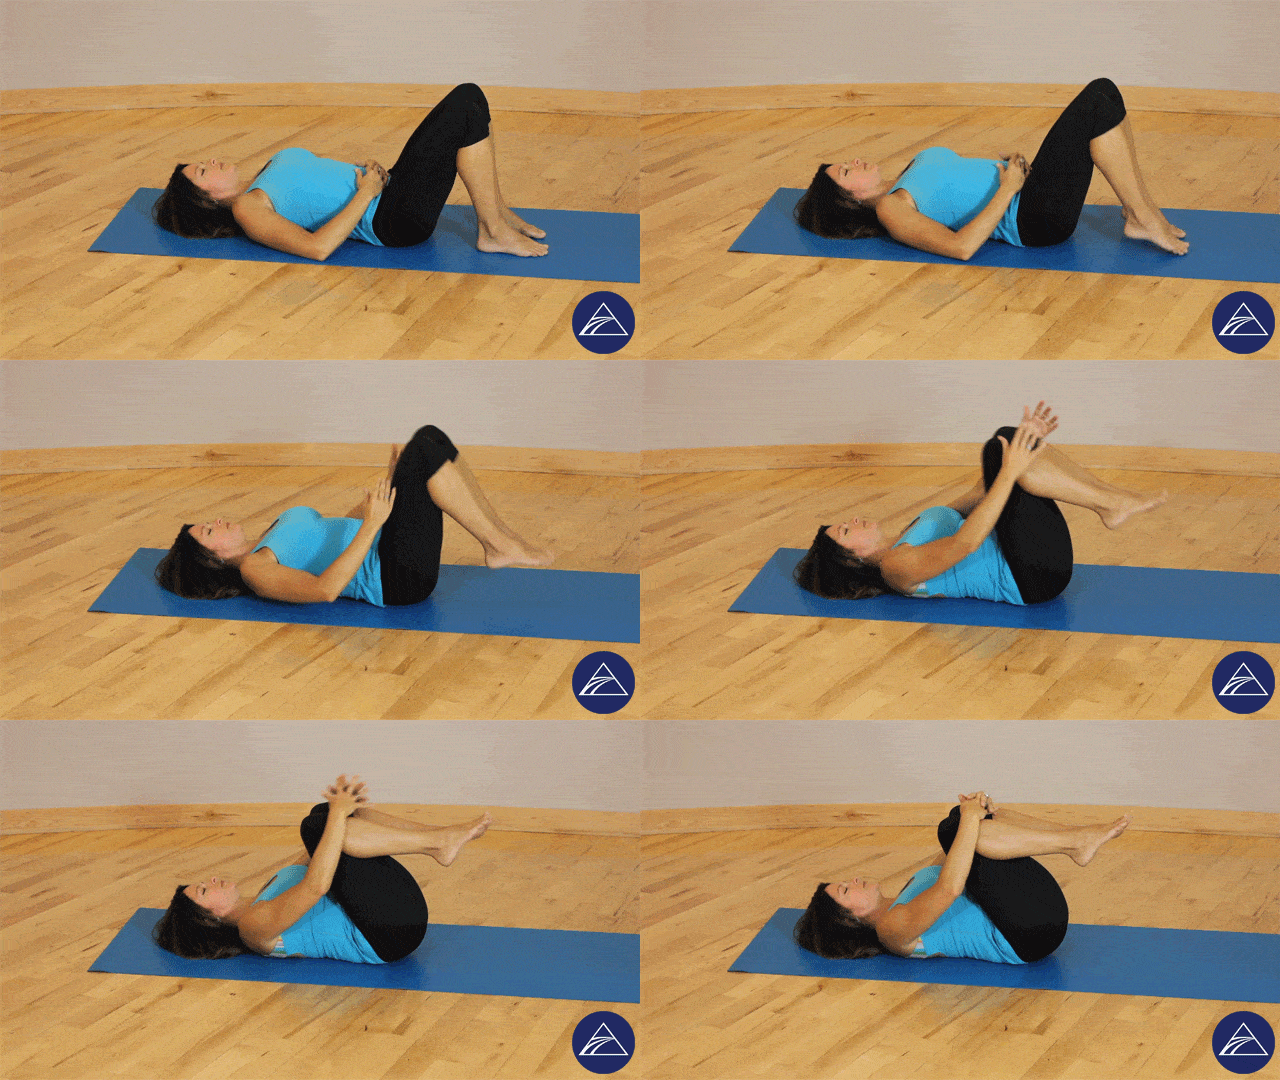
5. Wind Relieving Pose
As the name suggests, this pose has as one of it purposes, the reliving of gas that may be trapped in your intestine. However, because of the movements involved in this pose, it is also recognized as a great method of working those stomach muscles and breaking up and reducing that fat.
Explanation of Steps
- Lie flat on your back on you mat
- This one is easy. Exhale.
- Slowly bend your right knee up toward your chest beginning to inhale
- As your knee comes up grasp it with both hands and pull your head and chest up toward your knee. Hold it. Let your leg slowly return to the mat as you exhale
- Repeat the same procedure with your left knee.
- Then repeat the exercise with both knees together.
- You have finished one round. Try to doe 3-4 rounds at a time.
Benefits
In addition to strengthening and toning those stomach muscles and helping to relieve trapped gas, there are a few other things this pose does:
- It helps to strengthen your hips and thighs
- It reduces levels of acid in the stomach and provides relief for constipation
- It can help relieve loser back pain.
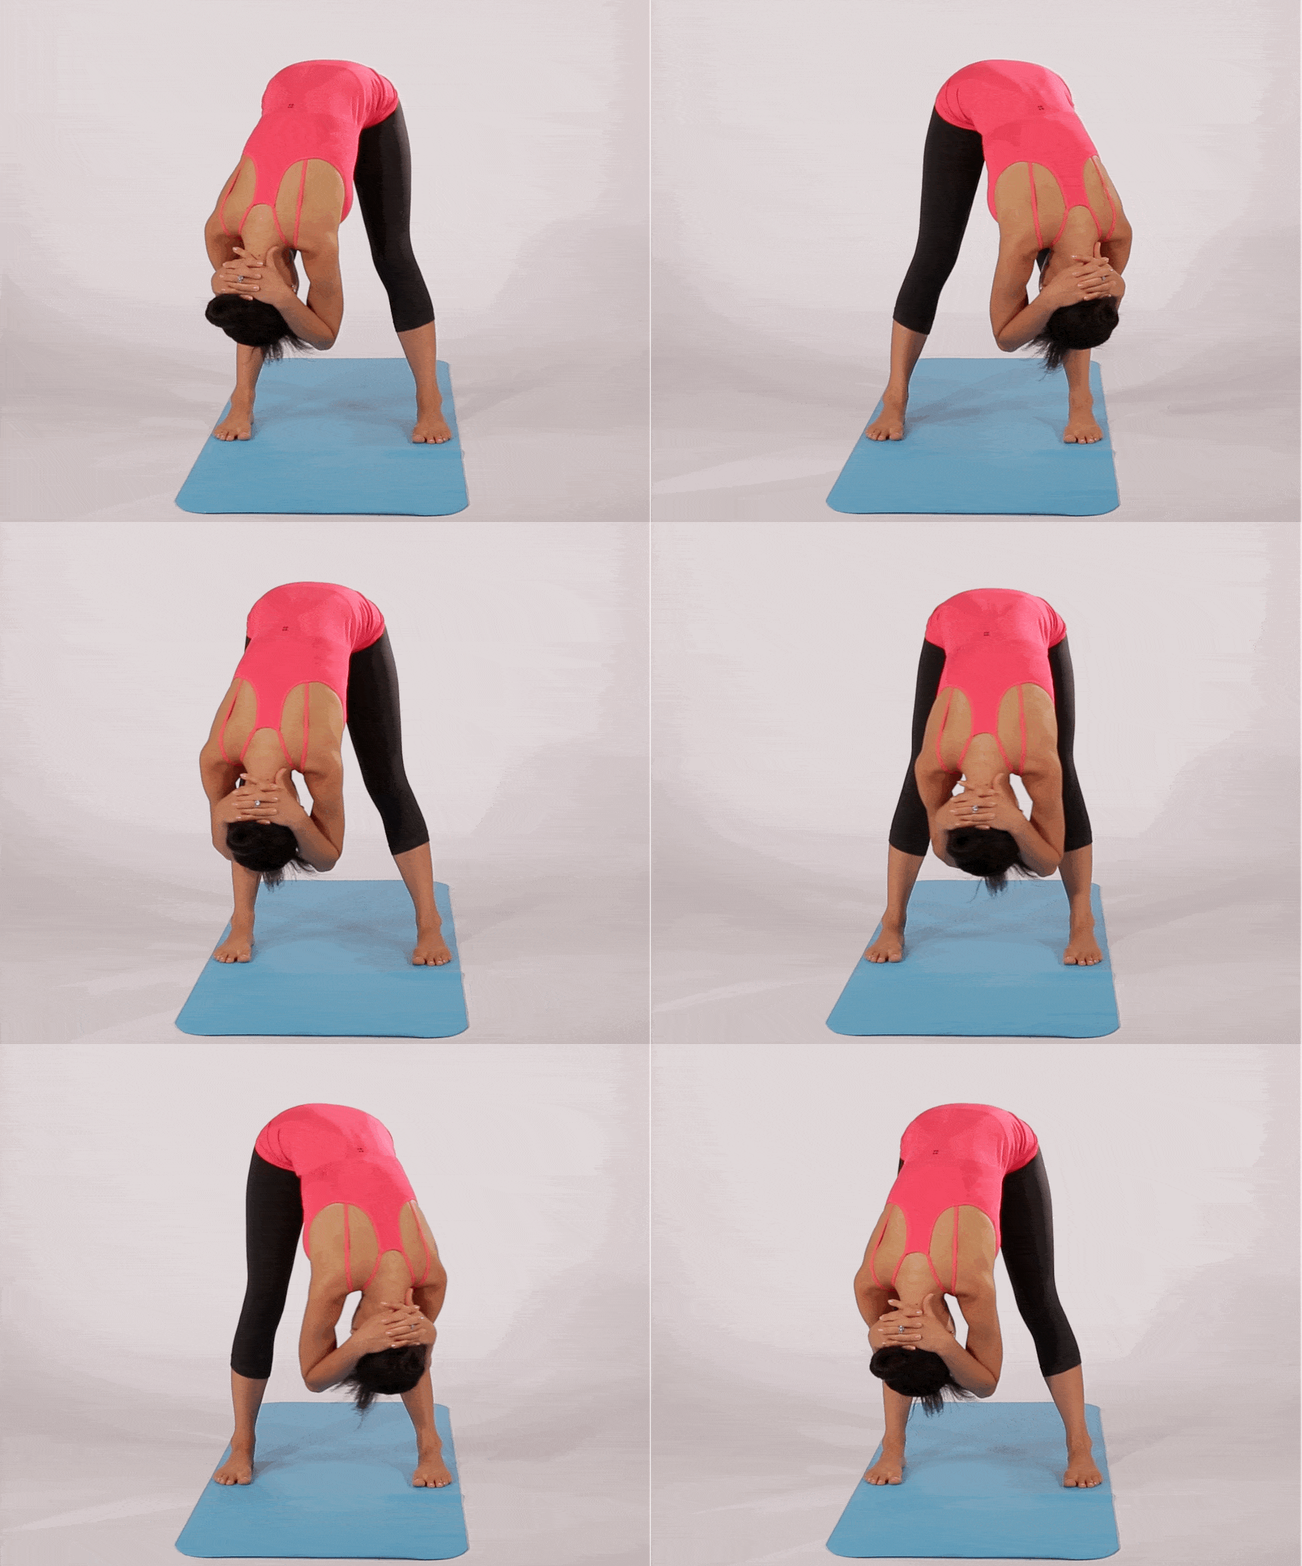
6. Standing Forward Bend
You are probably thinking that this looks like it would really hurt. Actually, once you have achieved some flexibility, it a relatively easy pose. The other key to achieving this pose is to really relax as you are bending down and go slowly. You will be surprised how much more you can stretch when you do this.
Explanation of Steps
- You want to stand straight with your arms at your side.
- Raise your arms up straight above your head. Inhale deeply as you do this.
- When you inhale is complete, you are ready to exhale as you bend from the hip.
- Keep your back straight as you bend. Slowly bend down as far as you are able to go.
- If you are able, place your palms on the floor. If not, don’t worry. Eventually you will.
- If you can put your palms on the floor, try to turn your hands over and place your fingers under your toes.
- Until you reach the point of being able to get those hands all the way down, just grab the backs of your legs with your hands, hopefully as far down as the ankles.
- Now you are ready to tuck your head in as close to your legs as possible.
- Hold the pose as long as you can – maybe a minute at first – and breathe deeply.
- To return to your standing position, you want to remember one word – slowly. Try to think of “rolling” up rather than jerking quickly.
- The slow return to a standing position is what is going to pull on that stomach, and that’s what you want.
- Try to do 5-10 of these in a session, but give yourself a break between each one.
Benefits
This pose benefits that protruding belly in two ways. First, when you are in the full pose, your stomach is compressed, and that compression burns belly fat. As you come back up slowly, you are toning and pulling on those muscles. Here are the other good things that happen:
- All of the muscles on the back of your body are stretched
- Obviously, you have increased the blood supply to your brain
- It really helps fatigue and insomnia
A Word of Caution
Do not engage in these poses if you have heart disease, high blood pressure, hip, back or joint pain, or if you have recently had abdominal, lung, brain or spine surgery. And many of them are not good for 2nd and 3rd trimester pregnancies. If you have any of these conditions, check with your doctor and show him/her the photos and videos in this post to see if you can safely adopt this program of exercise.
Featured photo credit: raganmd via flickr.com
